Acronis Backup & Recovery 11.5 Won’t Delete old Backups

Backups are so integral to any individual or company. However, backup errors can be quite frustrating to troubleshoot. Such was the case with this Acronis backup issue.

Problem: We installed Acronis Backup & Recovery Management Console on a server. From there we manage the backups for workstations. We kept running into the issue that the retention policies would never work. If we told the retention policy to delete backups older than 15 days, nothing would happen. It would save the backups and eventually fill up the external hard drive or network attached storage device. After digging around in the settings and trying to figure out if something wasn’t configured properly I was about ready to give up until I found this forum thread.

Here is how to fix your retention policy issue.

This is the example of the backup plan that was giving me issues.Acronis Simple Backup Plan I would do a simple backup scheme once a day. The backups would go to a Centralized Vault and were supposed to delete after 15 days. The problem was they would never be deleted and the NAS device would get filled with backups. Continue reading

How to Enable ” Delete Confirmation Dialog” in Windows 10

Microsoft is making many changes with their newest operating system, Windows 10. At the time of this article I am using Windows 10 Technical Preview Build 9926. Starting with Windows 8 and continuing into Windows 10, when you delete a file you don’t get a ” Would you like to delete this file?” confirmation dialog box. This setting is still disabled by default in the Windows 10 Build 9926. Below you will find a short video on how to disable this feature. If you would rather follow the written directions, you will find them below.


I personally don’t mind when I delete a file, that is just deletes it, and doesn’t prompt me to confirm my actions. However, if you want the extra security prompt before you delete the a file, here is how you enable it in Windows 10. These settings should also apply to Windows 8 or 8.1 as described in this article.

Step One: Right-click Recycle Bin on your desktop and select Properties.Recycle Bin Properties

Step Two: Check the box “Display delete confirmation dialog box”. Select Apply and then OK. Make sure you select the hard drive that you want this setting to affect. On my computer I have an SSD for the operating system and another hard drive for document storage. You can specify the setting for both drives or just one. Pretty neat!

Continue reading

Tips to Identify and Remove Poweliks Virus

Some more new malware that is hitting computers today. Thankfully there is a tool that can remove this one (or at least in my case). This blog post is about the Poweliks virus. You can find more detailed information about this virus on a couple other sites. I have the links at the bottom of the article.

The G DATA SecurityLabs have analyzed persistent malware which resides in the registry only and therefore does not create any file on the infected system. An overview of this mechanism was firstly described quite recently in the KernelMode.info forum. The analyzed sample is dropped by a Microsoft Word document which exploits the vulnerability described in CVE-2012-0158. The document was reported to be found as an attachment of fake Canada Post and/or USPS email which claims to hold information about ordered items for the recipient of the spam.

Source

I connected to a customer’s computer the other day. The laptop’s CPU usage was near 100% and had all kinds of crazy processes running. One process in particular was named inobbcrsb.exe. inobbcrsb.exe virusThis process was posing as a Google Chrome process. Also fixmapi.exe and msfeedssync.exe were using up an incredible amount of processing power.

First off download Process Explorer. You can see way more information on what is exactly happening with the processes on your computer. I knew inobbcrsb.exe had to be no good! I right-clicked on the process tree and suspended the process.Inobbcrsb.exe Posing as Google Chrome I checked the path where this executable was Continue reading

The File Name is Too Long Windows Explorer

Update 7/5/2017: Thanks to all my wonderful readers. Before trying the method below, you should try the Long Path Tool which can be downloaded here. If you would rather fix the error using the manual method check below. Thanks 

Problem: Customer tried to open a Word document and a PDF file he had created a while ago. Windows Explorer gave the an error, “file name is too long” when he tried to open his document.File Name is too Long - Windows Explorer

After a little digging around I found a solution to this problem. Windows 7 has a 256-260 character file/path limit. The file didn’t have a longer name than 256 characters, but the file was buried underneath many folders with big names.  I tried to right-click the file and select rename but I didn’t have that option. I couldn’t copy or cut the file to another location.

Resolution: Go one folder above where your document is stored. Rename that folder to something shorter (ex. name it one ). This should allow you to open the Word document now. Now change the Word file to a shorter name. Change the folder back to the original name. Check if you can still open your Word file. If you can still open the file, then you’re good! If you can’t open the file yet, move the folder to another location.

If you want to keep the file name of the document and the folder the same you should store the Word file in another location perhaps to your desktop or make a separate folder for the file.

Summary: In my situation, the customer had too many levels of folders with long names and spaces. The Word and PDF file he was trying to open had a big file name as well. Windows Explorer couldn’t handle long folder names and paths it gave the error, “file name is too long”.

Let me know if this helped you out by posting in the comments.

Source: WordBanter

This was posted by techspeeder.


Gmail IMAP “All Mail” Folder Missing in Outlook 2013

I set up a Gmail email address in Outlook 2013 the other day. The customer wanted his Gmail account set up as an IMAP account.  I entered the settings and configured the account. Everything was working fine besides the fact the “all mail” folder was missing. There is a simple fix for this.

Step One: Right-click on your Gmail account in Outlook and click new folder. Name the new folder All Mail.

Create All Mail Folder
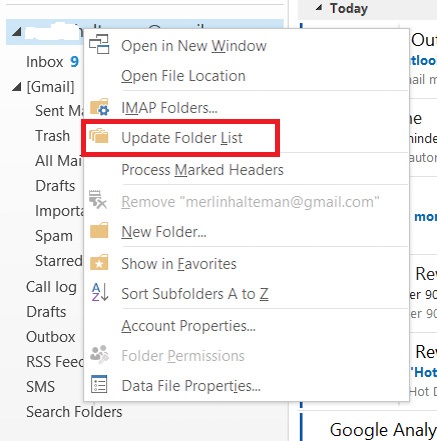
Step Two: Right-click on your email account select Update Folder ListUpdate Folders

Your email account will synchronize your folders and will now bring down your email into your “All Mail” folder.

That was the “fix” that worked for me. If this didn’t fix your problem you can also try the following suggestion. Continue reading