Windows 10 Tip: Show/Hide all Notification Area icons on the Windows Taskbar

After upgrading a computer from Windows 8 to Windows 10, I noticed the icons from the notification center were strung out across the task bar. Windows 10 Notification Across Taskbar


By default in Windows 10 your notification center will resemble this. Windows 10 Notifications

You will have your most important icons in your task bar and the rest will display if you click the “up” arrow.Default Notification Center Windows 10 Apparently, this setting can be turned on in Windows 10.  I decided to find out where to change it.

Open the Windows 10 Settings App (Win Key + I ) .  Continue reading

Font Changes In Outlook when Replying to Email Messages

I ran into a strange issue the other day. Our client said every time she replied to an email in Outlook her font would change to a different color. The version of Outlook my client was using was Outlook 2013 , but this “fix” will also work for Outlook 2016. I got to digging around a bit in Outlook 2013 and I found this was actually a “feature” instead of a problem.

If you find you font automatically changing on you, when replying to email messages, this is where you need to go to turn it off.

Step One: Open Outlook. Go to File > Options > Mail > Stationary and Fonts > Uncheck “Pick a new color when replying or forwarding”. Click OK.

Outlook Stationary ChangeThat is all you need to do. I tested this and each time when the client replied her font and font color stayed to what she had set to default.

I hope this help you! This was posted by techspeeder. Follow my blog or my Twitter feed to keep up with the latest troubleshooting tips.

Resolved: Office 2016 (0x80041015) We ran into a problem while trying to install the product key

Recently, we upgraded a customer from a local Exchange server to Office 365. For a majority of the users, we purchased Office 365 Business Premium licenses that included Office 2016 (Buy Office 2016).

Office 2016 activated just fine on all the computers besides one PC. The computer was running Windows 8.1 with Office 2013. We uninstalled Office 2013 and downloaded and installed Office 2016 from his Office 365 account. After the installation, a dialog box prompted him to sign into his Office 365 account to activate Office. He signed into his account, and Office 365 tried to verify his subscription but it would eventually error out and say:

Sorry, we ran into a problem while trying to install the product key. If this keeps happening, you should try repairing your office product. (System error: 0x80041015)Office 2016 Activation Error

I wasn’t sure what to do so I tried all the things below – but to no avail.

  1. I uninstalled Office – twice. Didn’t fix it.
  2. Tried Repairing Office 2016 – didn’t work.
  3. Logged in with the domain administrator account and tried activating Office – failed.
  4. Tried activating office with another Office 365 account – that didn’t work either.
  5. Started Office in Safe Mode – no go.
  6. Deleted credentials out of credential manager. Same results
  7. Upgraded computer from Windows 8 to Windows 10. – failed
  8. I downloaded and installed Office 2016 from his Office 365 account on another computer. This different computer activated just fine! So I knew it was a computer issue, not an Office 365 account problem .
  9. Logged into Windows 10 in Safe Mode to activate Office 2016. Failed.

I also checked Event Viewer for clues, and I found this. ” Installation of the Proof of Purchase failed. 0x80041015 Partial Pkey=M7TW3″  I looked online for help with this error but I came up empty.Security-SPP Office 2016

I was at the end of my troubleshooting rope. I decided to reach out to Microsoft about this issue. Here is what they advised me to do – and it fixed it! Below you will find the solution.

Solution: 

Step One:  Sign out from all your Office 365 applications.

Step Two: Remove the Office credentials from credential manager. To remove the Office credentials from credential manager please follow the below step

Go to Control Panel — > Credential Manager — > Windows Credentials — > Delete the Microsoft 15 credentials.

 Step Three: Remove the credentials from registry.  (Backup registry first)

Here is the Registry key location from where we can delete the identities and profiles  HKEY_Current_User \ Software \ Microsoft \ Office \ 15.0 \ Common \ Identity — > Delete the Identities and Profiles folders.

I opened up the Office applications and signed into the user’s Office account. Bingo! It activated right away.

Summary: Deleting those offending registry keys was the step that fixed my issueI hope this can help someone else. Please leave a comment below if this helped or if you have anything to add.

This was posted by techspeeder. Please subscribe to my blog for more troubleshooting tips. Thanks


Windows 10 VPN – “Connect” Missing from First List of Network Connections

Update: Microsoft Listened! The Windows 10 Creator’s update has fixed this issue! 


Okay, so I wasn’t sure how to title this article. However, I will endeavor to explain my frustration I am having with Windows 10’s VPN settings.

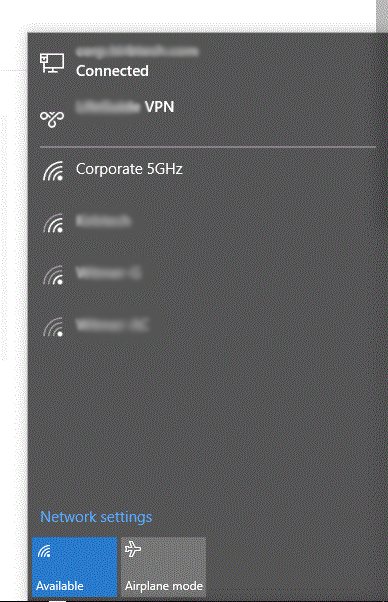
Whenever I click the network icon in Windows 10, it will bring up my local connection, WiFinetworks, and VPN connections. When I select my VPN connection instead of being able to connect directly from the first network setting list I get directed into the Settings app in Windows 10.

Windows 10 Network Connections

Connect is “Missing” underneath my VPN connection on Windows 10.

From the Settings app in Windows 10, I can then select my VPN connection and click connect. Continue reading

Disable Phone Pin Lock Exchange Policy on Exchange Server 2010

I upgraded one of our Microsoft Exchange 2010 servers to Exchange 2010 Service Pack 2. After the upgrade one of the users complained that they now had to create a pin or password  on their phones’ lock screens. Although I think this is a good idea for security purposes, this company didn’t want this hassle. This is how you disable the Exchange ActiveSync Mailbox policy from requiring a device password or pin .

Step One: Open Exchange Management Console

Step Two: Expand Organization Configuration > Client AccessExchange 2010 Policy

Step Three: Click Exchange ActiveSync Mailbox Polices tab and open the default policy.

Step Four: Click on the Password tab and uncheck Require Password. Apply your settingsExchange 2010 Device Password Policy.

These changes will automatically take affect across all of the devices.

If this post helped you, please consider sharing with your friends or following my blog. This was posted by techspeeder.